I have been putting off organizing these totes of mine for quite some time.
By the look of my living room floor, I should have put it off for a bit longer, lol.
If you know me you know I love planners, journals, notebooks and well, anything paper related.
I also craft all over.
I got to crops, to friends homes and anywhere around my house.
So I will grab another tote and fill it with the supplies I need for that project and move on...never to put away the supplies.
So I decided to go through everything.
This one is my Craftsman Tool Tote.
I have been using this for my planners and journals.
Then I just started to put other things in here, and it just got to stuffed and I kind of stopped using it as it didn't work for me anymore.
This one I bought from 31 Bags.
I use it to just throw stuff in.
Like when I am working on a project and tote my supplies to other areas in the house.
Truth Time: when I have to clean up and I don't feel like I have time to put my supplies in their proper places, I just dump them in this bag.
As tiny as this tote is...I can sure fill it up nicely, lol.
I keep this little tote on my desk when I am scrapbooking.
It has my pens, scissors, bone folder and other supplies and embellishments that I need (or may need) right in front of me.
I like this little tote as it doesn't take up a lot of room on my desk or table.
Now like everything when I organize...the first thing is to take everything out and see what I have.
I put things in a bit of an order.
Planner stickers, fauxbonichi stickers and stamps in the back.
Washi tape on the left.
Supplies that need to be put back in my craft room in the center.
Embellishments on the right.
Pens and inks in the front.
See a bit organized ;)
I took my planners, notebooks and journals out and am going to figure out a better way to keep them.
The Create 365 planner holder holds my Christmas planner.
I left it in there as I have loose papers in there pertaining to this planner.
Look at all of these empty totes.
I have to admit I do have more totes as I have a bit of an addiction to them.
I left the pens in my Craftsman tote as I have to go through them all as there are some that I don't like to write with, so they will get donated to friends.
You thought I would be sharing my organized totes with you today?!?!
I wish, lol.
My living room looks a bit like a stationary store blew up in it.
Hoping to complete it tomorrow, but I can't make any promises as I have another project I am doing with my daughter.
So many projects not enough me, lol
I hope you all have a very Creative Day today :)
Tracy :)
Showing posts with label defunkifying. Show all posts
Monday, May 1, 2017
Wednesday, September 14, 2016
Kitchen Cupboards Defunkified !!!
Not sure if you all remember I was going through my whole house and organizing it...I even started a series I call "Defunkifying My Life"
I was doing so well and I had documented my whole process.
Then I took a break when the weather got nice, as summer is so short and winter is so long.
Then sadly I lost all of the footage...that was so upsetting and frustrating.
But I still wanted to share my process with you all, so I decided to share anyway.
So because I lost all of my videos, I decided to share with you all the finished cupboards.
I did have some photos (as my phone died soon after my computer ate my videos), so I added them in the appropriate places in the video.
Here is my completed Kitchen Cupboards :)
I hope you find some tips or ideas to help you defunkify your kitchen.
If you would rather watch it on my YouTube Channel...click on my name "Tracy's Treasures24", as for some reason, it doesn't show the full screen on my blog.
Tracy :)
I was doing so well and I had documented my whole process.
Then I took a break when the weather got nice, as summer is so short and winter is so long.
Then sadly I lost all of the footage...that was so upsetting and frustrating.
But I still wanted to share my process with you all, so I decided to share anyway.
So because I lost all of my videos, I decided to share with you all the finished cupboards.
I did have some photos (as my phone died soon after my computer ate my videos), so I added them in the appropriate places in the video.
Here is my completed Kitchen Cupboards :)
I hope you find some tips or ideas to help you defunkify your kitchen.
If you would rather watch it on my YouTube Channel...click on my name "Tracy's Treasures24", as for some reason, it doesn't show the full screen on my blog.
Tracy :)
Thursday, July 21, 2016
Mini Albums....Defunkified
Oh look another area organized.
Mind you I had done this one a few months ago, but just sharing now...oops.
These are the mini albums that I haven't worked on yet.
They are all blank.
I know, I know, I never need to purchase another mini album in my life....but that doesn't mean I won't ;)
Looking at these shelves I see so much potential to create.
I did a video on what it looked like before and how I organized them.
I forgot to take a before photo...another oops.
If you would rather watch the video on my YouTube channel, just click on the link :)
"Tracy's Treasures24"
I hope you all had a very creative day :)
I stayed inside and cleaned all day as it was a bit to hot out do do much of anything out there.
Tracy :)
Mind you I had done this one a few months ago, but just sharing now...oops.
These are the mini albums that I haven't worked on yet.
They are all blank.
I know, I know, I never need to purchase another mini album in my life....but that doesn't mean I won't ;)
Looking at these shelves I see so much potential to create.
I did a video on what it looked like before and how I organized them.
I forgot to take a before photo...another oops.
If you would rather watch the video on my YouTube channel, just click on the link :)
"Tracy's Treasures24"
I hope you all had a very creative day :)
I stayed inside and cleaned all day as it was a bit to hot out do do much of anything out there.
Tracy :)
Tuesday, July 19, 2016
Display Shelves...Defunkified
Following the challenge (52 weeks, workroom challenge put on by The Keeper of Memories) I was working on in the Spring, one of challenges was to organize your mini albums.
After completing this, I got to thinking that I did my completed mini albums, not my albums not yet used.
So instead I guess I organized my display shelves ;)
I had lots of smaller projects that I had made that were shoved behind bigger projects.
So I took everything off of the shelve and went through everything.
I had a lot of gift card holders and treat bags that I had made, but didn't use.
I think it looks so much more organized now.
I may add another shelve or two higher up for future albums.
I can't reach this high up, but I don't have to as it is more for displaying my albums and if I want to get one down, I can easily grab a stool to stand on :)
I also did a video on how I organized my shelves and what I had on them...as well as a little laugh ;)
If you would rather watch it on my YouTube channel, just click on the link "Tracy's Treasures24"
Onto My Day:
I enjoyed a great day with my friend.
Our birthday's are on the same day and we are the same age, so we like to get together for lunch to celebrate it .
We have known each other since I was in second grade!!!!
We may not see each other as much as we would like to, but when we do, it is like we haven't missed any time apart at all.
Don't you just love friends that you are so connected to.
I hope you all had a very creative day today :)
Tracy :)
After completing this, I got to thinking that I did my completed mini albums, not my albums not yet used.
So instead I guess I organized my display shelves ;)
I had lots of smaller projects that I had made that were shoved behind bigger projects.
So I took everything off of the shelve and went through everything.
I had a lot of gift card holders and treat bags that I had made, but didn't use.
I think it looks so much more organized now.
I may add another shelve or two higher up for future albums.
I can't reach this high up, but I don't have to as it is more for displaying my albums and if I want to get one down, I can easily grab a stool to stand on :)
Steps to Defunkifying
1. Remove..Take it all out
2.Clean..Wipe Down Area
3.Purge..Rid the unwanted
4.Sort..Put 'Likes' together
5.Organize..Put Away :)I also did a video on how I organized my shelves and what I had on them...as well as a little laugh ;)
If you would rather watch it on my YouTube channel, just click on the link "Tracy's Treasures24"
Onto My Day:
I enjoyed a great day with my friend.
Our birthday's are on the same day and we are the same age, so we like to get together for lunch to celebrate it .
We have known each other since I was in second grade!!!!
We may not see each other as much as we would like to, but when we do, it is like we haven't missed any time apart at all.
Don't you just love friends that you are so connected to.
I hope you all had a very creative day today :)
Tracy :)
Friday, May 13, 2016
Adhesives....Defunkified!!!
I tackled my adhesives and LOVE how it turned out.
Is it odd to be this excited about organized glue?!?!
I had a mixture of different types of adhesives in this one drawer on my desk.
I like how they were close at hand...but a mess to just grab and go.
I kept my foam adhesives, double sided tapes, glue dots (or snot dots as I call them) and some of my ATG refills in here.
But you may wonder...where does Tracy store her liquid adhesive.
Well let me tell you...I kept them in a high cupboard behind my desk.
As you can see, I seemed to store more than just adhesives in there.
I had this container in there and was excited to see what treasures I had forgot about.
Turns out...it was clear packaging I had saved to make shaker cards, and recipes I will never make...I don't even like to cook!!
Now I have an empty container as I trashed what was inside.
I did a video in more detail....now doesn't that make you happy, teehee.
If you would rather watch it on my YouTube channel, just click the link "Tracy's Treasures24"
I do keep a small amount of adhesive in my working bin, but the rest is tucked away in these containers that easily slide out.
One container for each type of adhesive...liquid, double sided, foam and then my hot glue guns :)
I know you want to have one last look ;)
I hope you all have a very Creative and organized day :)
Tracy :)
Is it odd to be this excited about organized glue?!?!
I had a mixture of different types of adhesives in this one drawer on my desk.
I like how they were close at hand...but a mess to just grab and go.
I kept my foam adhesives, double sided tapes, glue dots (or snot dots as I call them) and some of my ATG refills in here.
But you may wonder...where does Tracy store her liquid adhesive.
Well let me tell you...I kept them in a high cupboard behind my desk.
As you can see, I seemed to store more than just adhesives in there.
I had this container in there and was excited to see what treasures I had forgot about.
Turns out...it was clear packaging I had saved to make shaker cards, and recipes I will never make...I don't even like to cook!!
Now I have an empty container as I trashed what was inside.
I did a video in more detail....now doesn't that make you happy, teehee.
If you would rather watch it on my YouTube channel, just click the link "Tracy's Treasures24"
I do keep a small amount of adhesive in my working bin, but the rest is tucked away in these containers that easily slide out.
One container for each type of adhesive...liquid, double sided, foam and then my hot glue guns :)
I know you want to have one last look ;)
I hope you all have a very Creative and organized day :)
Tracy :)
Tuesday, May 10, 2016
Pocket Cards...Defunkified!!!
Now don't these look so nice and organized...
Well you know they didn't start off looking that good :)
I kept my pocket cards and my tags together in this Ikea container.
And kept the Ikea container in this tray.
And as I had mentioned before, I tend to pile things without a home, on top of flat surfaces....and this was as good as a flat surface to me ;)
I also purchased quite a few more Pocket cards and kits.
Funny as I don't do Project Life (as this is what these are intended for) but I sure seem to purchase them.
So first thing I do when organizing is to put everything out on my large table.
Once I have everything in front of me, it is easier to see all that I have.
It is also easier to see what I don't want and can pass on to other and also find the best way to organize and store them.
At first I was going to store them in the Core kit packaging.
That would have worked great!!!
But I found out I could store more in these Ikea containers.
Thankfully I picked up a few of them on one of our trips.
This Ikea container holds the older cards that I had.
As well as my grid and index cards.
I put the core kits and some other smaller kits in this second Ikea container.
I also cut the packaging from the boxes and put them in the back of the container.
Because the packaging has pictures of which cards are in which kits, it is easier to find the ones I want.
I made a tab for each kit, labeled them and even added a card from that kit on the front of the tab, so I know at quick glance what colours are in that kit.
I am really happy with how these turned out, I can see at a quick glance which ones I have and I don't have to open a package each time I want to get one card.
I have been learning a couple of things about how I work and how to organize my supplies that will work better for me :)
Now onto the video :)
If you would rather watch it with the full screen, check out my YouTube channel for this video and many others :)
"Tracy's Treasures24"
I hope you all have a very Creative Day :)
Tracy :)
Well you know they didn't start off looking that good :)
I kept my pocket cards and my tags together in this Ikea container.
And kept the Ikea container in this tray.
And as I had mentioned before, I tend to pile things without a home, on top of flat surfaces....and this was as good as a flat surface to me ;)
I also purchased quite a few more Pocket cards and kits.
Funny as I don't do Project Life (as this is what these are intended for) but I sure seem to purchase them.
So first thing I do when organizing is to put everything out on my large table.
Once I have everything in front of me, it is easier to see all that I have.
It is also easier to see what I don't want and can pass on to other and also find the best way to organize and store them.
At first I was going to store them in the Core kit packaging.
That would have worked great!!!
But I found out I could store more in these Ikea containers.
Thankfully I picked up a few of them on one of our trips.
This Ikea container holds the older cards that I had.
As well as my grid and index cards.
I put the core kits and some other smaller kits in this second Ikea container.
I also cut the packaging from the boxes and put them in the back of the container.
Because the packaging has pictures of which cards are in which kits, it is easier to find the ones I want.
I made a tab for each kit, labeled them and even added a card from that kit on the front of the tab, so I know at quick glance what colours are in that kit.
I am really happy with how these turned out, I can see at a quick glance which ones I have and I don't have to open a package each time I want to get one card.
I have been learning a couple of things about how I work and how to organize my supplies that will work better for me :)
Now onto the video :)
If you would rather watch it with the full screen, check out my YouTube channel for this video and many others :)
"Tracy's Treasures24"
I hope you all have a very Creative Day :)
Tracy :)
Monday, April 25, 2016
Punches….Defunkified!!!
When I go in my room, I am really starting to like what I see.
I have so much to share with you :)
I have gone way past organizing my punches, but one area at a time :)
I have this shelving unit that I have had for many years.
It has housed many of my supplies..flowers, ribbon, sequins even my mists.
But I had moved many of these supplies to other areas and it became a bit of a mess.
I like to keep my "like" supplies together and since I have some of my punches on those towel racks attached to the wall, right beside this unit…I thought I should use my this to hold some of my punches I had on the floor.
Here is how I have been storing my punches ever since I made my room years ago.
I like to see my supplies….but in a way that is pleasing to the eye.
Which for me this is :)
Not only do I like to see these on my wall, it is also easy for my friends to find a punch if they need one.
When the door to my room is open, these punches are behind it.
I also keep my bigger punches in this over the door shoe organizer.
The pockets are big enough for those very large punches.
Like the punches on the wall on the towel racks, these are also hidden when the door is open.
At first I had these Stampin' Up punches stacked on top of each other.
But the images on the stickers were upside down….considering how messy my room was, you would think that this wouldn't bother me…but it really did.
So I decided to put them on their sides…this helped, lol.
Putting them on their sides also helps not to scratch the shiny images on the tops of the punches when sliding them off of one another.
Win win :)
Tips on how I defunkify my space:
1. Remove-Take everything out or off and gather it in one space.
2. Clean-Use some cleaner and wipe the area down.
3. Sort-Put all like items together.
4. Purge- Get rid of any punches that you no longer use or want…I actually kept all of my punches.
5. Organize- Put away and organize the remaining items.
I am documenting my Defunkifying process on my YouTube channel as well.
I can share more in the videos then I do with just the photos I can share on here.
If you would rather watch the video on my YouTube channel, then just click the link "Tracy's Treasures24" to go to my YouTube channel…and hey if you do that, you might as well give me a thumbs up :)
I can't wait to show you what else I have been working on.
Just takes time to edit and upload the videos.
Are you Defunkifying your space?
If you are, I would love to hear what you are working on and how it is going :)
I hope you all have a very creative day :)
Tracy :)
I have so much to share with you :)
I have gone way past organizing my punches, but one area at a time :)
I have this shelving unit that I have had for many years.
It has housed many of my supplies..flowers, ribbon, sequins even my mists.
But I had moved many of these supplies to other areas and it became a bit of a mess.
I like to keep my "like" supplies together and since I have some of my punches on those towel racks attached to the wall, right beside this unit…I thought I should use my this to hold some of my punches I had on the floor.
Here is how I have been storing my punches ever since I made my room years ago.
I like to see my supplies….but in a way that is pleasing to the eye.
Which for me this is :)
Not only do I like to see these on my wall, it is also easy for my friends to find a punch if they need one.
When the door to my room is open, these punches are behind it.
I also keep my bigger punches in this over the door shoe organizer.
The pockets are big enough for those very large punches.
Like the punches on the wall on the towel racks, these are also hidden when the door is open.
At first I had these Stampin' Up punches stacked on top of each other.
But the images on the stickers were upside down….considering how messy my room was, you would think that this wouldn't bother me…but it really did.
So I decided to put them on their sides…this helped, lol.
Putting them on their sides also helps not to scratch the shiny images on the tops of the punches when sliding them off of one another.
Win win :)
Tips on how I defunkify my space:
1. Remove-Take everything out or off and gather it in one space.
2. Clean-Use some cleaner and wipe the area down.
3. Sort-Put all like items together.
4. Purge- Get rid of any punches that you no longer use or want…I actually kept all of my punches.
5. Organize- Put away and organize the remaining items.
I am documenting my Defunkifying process on my YouTube channel as well.
I can share more in the videos then I do with just the photos I can share on here.
If you would rather watch the video on my YouTube channel, then just click the link "Tracy's Treasures24" to go to my YouTube channel…and hey if you do that, you might as well give me a thumbs up :)
I can't wait to show you what else I have been working on.
Just takes time to edit and upload the videos.
Are you Defunkifying your space?
If you are, I would love to hear what you are working on and how it is going :)
I hope you all have a very creative day :)
Tracy :)
Saturday, April 16, 2016
Scrapbooking Kits…Defunkified!!
This one was an easy one to tackle :)
Mostly because I don't have a ton of scrapbooking page kits (I do have my fair share) but not a ton.
I don't belong to any type of scrapbooking kit club, I purchased most of these from when the Crop & Create event came to our city.
I think I bought every one they sold over the last 3 years, lol.
My kits were all in a few tote bags, so they were more or less all together.
And being as they are kits, they are all contained in bags already, so no tedious organizing :)
I put them in a bit of order, such as:
Paper kits I put together,
Christmas kits,
mini album kits,
Fall kits,
and lastly….Pocket Page kits.
which I found odd that I purchased these, and I don't even do pocket pages, lol.
My Tips on Defunkifying:
1. Remove or Gather- Collect all of your page kits and put them all in the same area.
2. Clean- wipe down the area where you plan to store your kits.
3. Sort- Put all like items together…in this case, they are already contained in their own bags…so easy :)
4. Purge- I know…bite my tongue. I didn't purge any of my kits as they are all projects I am planning on completing..one day ;)
5. Organize- Put away in a place that works for you :)
Now I better get to work putting these Kits together….Crop & Create will be here in October ;)
I put together a video in more detail on Defunkifying my Scrapbooking Kits
If you would rather watch it on my YouTube channel, click the link and maybe leave me a comment and a thumbs up :) "Tracy's Treasures24"
I hope you are all have a wonderful and creative weekend :)
We actually have beautiful weather here and I got to go out for a nice walk….the snow is almost gone…if this weather keeps up, it should be all gone in a couple of weeks :)
Tracy :)
Mostly because I don't have a ton of scrapbooking page kits (I do have my fair share) but not a ton.
I don't belong to any type of scrapbooking kit club, I purchased most of these from when the Crop & Create event came to our city.
I think I bought every one they sold over the last 3 years, lol.
My kits were all in a few tote bags, so they were more or less all together.
And being as they are kits, they are all contained in bags already, so no tedious organizing :)
I put them in a bit of order, such as:
Paper kits I put together,
Christmas kits,
mini album kits,
Fall kits,
and lastly….Pocket Page kits.
which I found odd that I purchased these, and I don't even do pocket pages, lol.
My Tips on Defunkifying:
1. Remove or Gather- Collect all of your page kits and put them all in the same area.
2. Clean- wipe down the area where you plan to store your kits.
3. Sort- Put all like items together…in this case, they are already contained in their own bags…so easy :)
4. Purge- I know…bite my tongue. I didn't purge any of my kits as they are all projects I am planning on completing..one day ;)
5. Organize- Put away in a place that works for you :)
Now I better get to work putting these Kits together….Crop & Create will be here in October ;)
I put together a video in more detail on Defunkifying my Scrapbooking Kits
If you would rather watch it on my YouTube channel, click the link and maybe leave me a comment and a thumbs up :) "Tracy's Treasures24"
I hope you are all have a wonderful and creative weekend :)
We actually have beautiful weather here and I got to go out for a nice walk….the snow is almost gone…if this weather keeps up, it should be all gone in a couple of weeks :)
Tracy :)
Thursday, April 7, 2016
6x6 Paper Pads…Defunkified!!
Time to organize my 6x6 paper pads.
Look how nice and organized they are…but they didn't start out this way.
Honestly though..I don't think my 6x6 paper pads were in all that bad of shape.
They were out of order and overflowing…but looking at my whole room, they weren't that bad, lol.
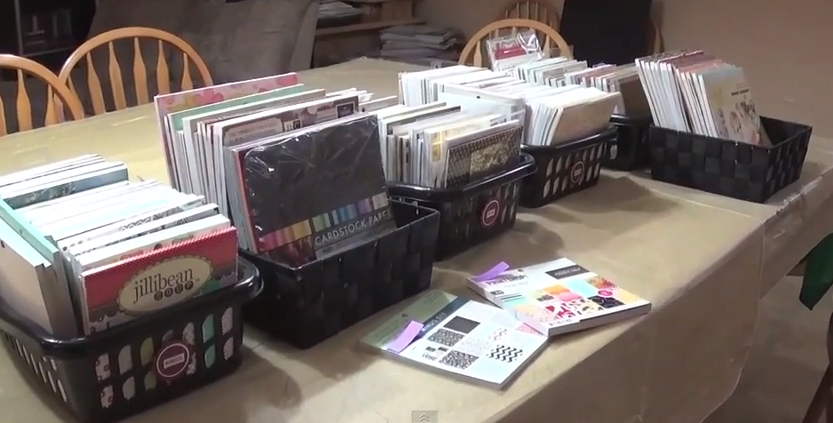
The first thing to do in defunkifying or organizing is to take all "like" items, in this case, my 6x6 and 8x8 paper pads, into a bigger area to work on them.
My scrap-pool table is perfect for this,
Next thing is to organize them in a way that works for you.
For me, my sections are
Vintage
Whimsical/Brights
Pastels
Seasonal
I then grabbed a couple of containers for my 8x8 paper pads.
I don't have as many of those so Vintage & Whimsical are in one container, then Pastel & Seasonal in a different container.
I only found 2 paper pads that I had doubles of, surprise, surprise.
Look how nice and organized they are…so pretty :)
I put the 8x8 paper pads in the very bottom of the shelves.
I did a video on my process on how I organized them and how they were before I did this.
If you would like to watch it on my YouTube channel, just click the link "Tracy's Treasures24"
Here are my tips on how to Defunkify your papers.
1. Remove- all of your papers that need to be organized
2. Sort - Put all like items together.
3. Purge- Donate or gift the paper pads you don't think you will use
4. Clean- wipe down the shelves or area that you are going to store your paper pads.
5. Organize- Put away and organize the remaining papers.
I hope you are following along with me on defunkifying my craft/scrap room.
If you are, I would love to hear what you are working on:)
I hope you all have a very creative day
Tracy :)
Look how nice and organized they are…but they didn't start out this way.
Honestly though..I don't think my 6x6 paper pads were in all that bad of shape.
They were out of order and overflowing…but looking at my whole room, they weren't that bad, lol.
The first thing to do in defunkifying or organizing is to take all "like" items, in this case, my 6x6 and 8x8 paper pads, into a bigger area to work on them.
My scrap-pool table is perfect for this,
Next thing is to organize them in a way that works for you.
For me, my sections are
Vintage
Whimsical/Brights
Pastels
Seasonal
I then grabbed a couple of containers for my 8x8 paper pads.
I don't have as many of those so Vintage & Whimsical are in one container, then Pastel & Seasonal in a different container.
I only found 2 paper pads that I had doubles of, surprise, surprise.
Look how nice and organized they are…so pretty :)
I put the 8x8 paper pads in the very bottom of the shelves.
I did a video on my process on how I organized them and how they were before I did this.
If you would like to watch it on my YouTube channel, just click the link "Tracy's Treasures24"
Here are my tips on how to Defunkify your papers.
1. Remove- all of your papers that need to be organized
2. Sort - Put all like items together.
3. Purge- Donate or gift the paper pads you don't think you will use
4. Clean- wipe down the shelves or area that you are going to store your paper pads.
5. Organize- Put away and organize the remaining papers.
I hope you are following along with me on defunkifying my craft/scrap room.
If you are, I would love to hear what you are working on:)
I hope you all have a very creative day
Tracy :)
Tuesday, March 10, 2015
A 15 Minute Day
Today was a 15 minute type of a day.
Because Wayne took yesterday off of work, not too much got done.
I would rather spend my time with him, than clean the house.
I have no idea what is going to happen when he retires….I guess our home will go to pot, lol.
I try to do this every Monday, but it doesn't always work out that way.
But when I feel like I am behind, or need a jump start on my home cleaning. I set my timer to 15 minutes and work in each room for that amount of time.
When the timer goes off, I stop, reset it and go onto the next room.
So much can get done in 15 minutes.
For example, in the dining room, I was able to tidy up the room, hand dust the chandelier, my pictures and frames, change the table cloth and put up a new centrepiece on the table.
The 15 minutes in each room, is to make the room presentable, not to detail clean, just so when you walk in that room, it looks organized and pleasing to the eye.
Because my dining room is the least used room in the house, I was able to do a bit of detailed cleaning in here.
I also take breaks.
After doing a few rooms, I will set the timer for another 15 minutes and spend some time on the computer or reading.
This worked great today, until Heather came home from work and we decided to go in the rec-room for some "The Last of Us" gaming ;)
I hope you all had a very Creative Tuesday :)
Tracy :)
Because Wayne took yesterday off of work, not too much got done.
I would rather spend my time with him, than clean the house.
I have no idea what is going to happen when he retires….I guess our home will go to pot, lol.
I try to do this every Monday, but it doesn't always work out that way.
But when I feel like I am behind, or need a jump start on my home cleaning. I set my timer to 15 minutes and work in each room for that amount of time.
When the timer goes off, I stop, reset it and go onto the next room.
So much can get done in 15 minutes.
For example, in the dining room, I was able to tidy up the room, hand dust the chandelier, my pictures and frames, change the table cloth and put up a new centrepiece on the table.
The 15 minutes in each room, is to make the room presentable, not to detail clean, just so when you walk in that room, it looks organized and pleasing to the eye.
Because my dining room is the least used room in the house, I was able to do a bit of detailed cleaning in here.
I also take breaks.
After doing a few rooms, I will set the timer for another 15 minutes and spend some time on the computer or reading.
This worked great today, until Heather came home from work and we decided to go in the rec-room for some "The Last of Us" gaming ;)
I hope you all had a very Creative Tuesday :)
Tracy :)
Wednesday, August 13, 2014
Defunkifying my Craft Room Video 3 Chipboard & Wood mound stamps
As you know I have taken a break from my craft room re-do or defunkifying my craft room as I have named it ;)
But here is my last video from May.
I had organized my wood stamps last year, but didn't share it as I wasn't sure if I was totally happy with it.
What I did do though, we move them to a different location in my room for easier access.
To move it to this cupboard, I had to totally clean out this cupboard.
More details on this in my video.
I also used these empty Ferrero Rocher chocolate containers for my chipboard pieces.
I also used these empty containers for my stationary/mail drawers as well. Nothing like free storage containers ;)
Most of my chipboard pieces were in the cupboard above, again more details of this in my video.
And talking about my video…here it is.
I you would rather watch the video on my Youtube channel, just click my link "Tracy's Treasures24"
I hope you all had a very Creative Day :)
Tracy :)
But here is my last video from May.
I had organized my wood stamps last year, but didn't share it as I wasn't sure if I was totally happy with it.
What I did do though, we move them to a different location in my room for easier access.
To move it to this cupboard, I had to totally clean out this cupboard.
More details on this in my video.
I also used these empty Ferrero Rocher chocolate containers for my chipboard pieces.
I also used these empty containers for my stationary/mail drawers as well. Nothing like free storage containers ;)
Most of my chipboard pieces were in the cupboard above, again more details of this in my video.
And talking about my video…here it is.
I you would rather watch the video on my Youtube channel, just click my link "Tracy's Treasures24"
I hope you all had a very Creative Day :)
Tracy :)
Tuesday, August 12, 2014
Defunkifying my Life Revisited
I decided to revisit some of my "Defunkifying my Life Missions".
The reason, I really needed to revisit my stationary drawer.
You can check out my first post here "Defunkifying my Stationary Drawer"
As you can see it really needed a revisit ;)
I did what I normally do when I decide to organize.
1. Empty-Take everything out of the drawer.
2. Clean-clean out the drawer.
3. Sort-Put all "like" items together.
4. Purge-Get rid of papers you don't need, pens that are dead and anything else that doesn't belong.
5. Organize-Put away the remaining items.
I am sure there are still objects in here that I don't need and other objects that belong in here.
Even though I have been retired from doing the book work, I still think like a book keeper and usually have to many office supplies on hand…mind you what crafter doesn't enjoy office supplies ;)

Now to find a new home for all of these supplies ;)
I have an area downstairs, where I kept my work stuff, that has extra packages of pens, pencils, white out, paper and such.
So a lot of these supplies will go in there.
The rest is mostly receipts that should be attached to my bills. I seem to have fallen behind on that task these last few months.
I am going to try and dedicate organizing my bills and such on Mondays.
I will call it "Mail Day Monday"…pretty catchy eh, teehee.
Oh ya, the reason for the dish clothes on the table….my table gets scratched very easily, so I need to protect it. I honestly hate this new table….but guess I have to live with it now :(
I still have to work on my craft room, but because it is summer and my room is downstairs with no windows, I will wait a bit to finish it. I like the summer sun too much ;)
Have you been organizing/defunkifying anything lately?
Tracy :)
The reason, I really needed to revisit my stationary drawer.
You can check out my first post here "Defunkifying my Stationary Drawer"
As you can see it really needed a revisit ;)
I did what I normally do when I decide to organize.
1. Empty-Take everything out of the drawer.
2. Clean-clean out the drawer.
3. Sort-Put all "like" items together.
4. Purge-Get rid of papers you don't need, pens that are dead and anything else that doesn't belong.
5. Organize-Put away the remaining items.
I am sure there are still objects in here that I don't need and other objects that belong in here.
Even though I have been retired from doing the book work, I still think like a book keeper and usually have to many office supplies on hand…mind you what crafter doesn't enjoy office supplies ;)

Now to find a new home for all of these supplies ;)
I have an area downstairs, where I kept my work stuff, that has extra packages of pens, pencils, white out, paper and such.
So a lot of these supplies will go in there.
The rest is mostly receipts that should be attached to my bills. I seem to have fallen behind on that task these last few months.
I am going to try and dedicate organizing my bills and such on Mondays.
I will call it "Mail Day Monday"…pretty catchy eh, teehee.
Oh ya, the reason for the dish clothes on the table….my table gets scratched very easily, so I need to protect it. I honestly hate this new table….but guess I have to live with it now :(
I still have to work on my craft room, but because it is summer and my room is downstairs with no windows, I will wait a bit to finish it. I like the summer sun too much ;)
Have you been organizing/defunkifying anything lately?
Tracy :)
Tuesday, May 13, 2014
Defunkifying my Flowers
I had shared with you before I how organize or I should say re-organized my flowers.
So far, so good.
It is still working great for me.
I like that I can see through these containers.
I also like that they are thin…so I can only keep a limited amount of flowers in each container ;)
They stack nicely, but I store them upright…easier to pick the colour I want without having to move them around.
They are the thin Iris containers, I purchased them from Michaels.
I was suppose to use these containers for re-organizing my wood stamps….guess I need to pick up some more, teehee.
I made a video explaining this in more detail ;)
I hope you all had a creative Tuesday :)
Tracy :)
So far, so good.
It is still working great for me.
I like that I can see through these containers.
I also like that they are thin…so I can only keep a limited amount of flowers in each container ;)
They stack nicely, but I store them upright…easier to pick the colour I want without having to move them around.
They are the thin Iris containers, I purchased them from Michaels.
I was suppose to use these containers for re-organizing my wood stamps….guess I need to pick up some more, teehee.
I made a video explaining this in more detail ;)
I hope you all had a creative Tuesday :)
Tracy :)
Labels:
defunkifying,
flower organizing,
flowers,
organizing,
tracy's treasures
Subscribe to:
Posts (Atom)


