Time to organize my 6x6 paper pads.
Look how nice and organized they are…but they didn't start out this way.
Honestly though..I don't think my 6x6 paper pads were in all that bad of shape.
They were out of order and overflowing…but looking at my whole room, they weren't that bad, lol.
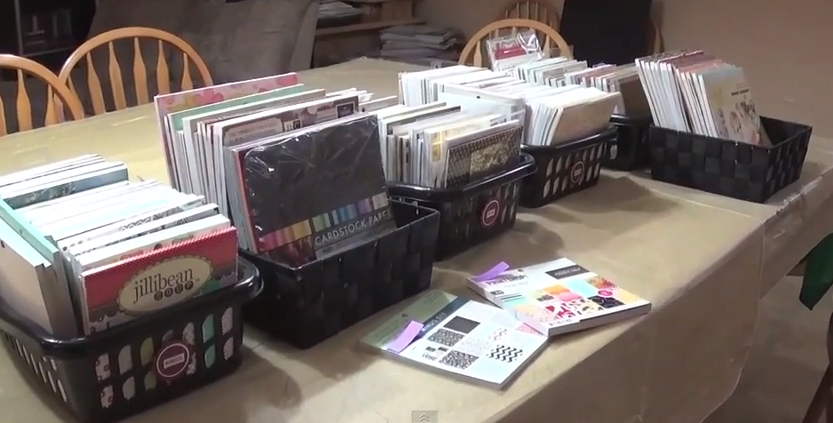
The first thing to do in defunkifying or organizing is to take all "like" items, in this case, my 6x6 and 8x8 paper pads, into a bigger area to work on them.
My scrap-pool table is perfect for this,
Next thing is to organize them in a way that works for you.
For me, my sections are
Vintage
Whimsical/Brights
Pastels
Seasonal
I then grabbed a couple of containers for my 8x8 paper pads.
I don't have as many of those so Vintage & Whimsical are in one container, then Pastel & Seasonal in a different container.
I only found 2 paper pads that I had doubles of, surprise, surprise.
Look how nice and organized they are…so pretty :)
I put the 8x8 paper pads in the very bottom of the shelves.
I did a video on my process on how I organized them and how they were before I did this.
If you would like to watch it on my YouTube channel, just click the link "Tracy's Treasures24"
Here are my tips on how to Defunkify your papers.
1. Remove- all of your papers that need to be organized
2. Sort - Put all like items together.
3. Purge- Donate or gift the paper pads you don't think you will use
4. Clean- wipe down the shelves or area that you are going to store your paper pads.
5. Organize- Put away and organize the remaining papers.
I hope you are following along with me on defunkifying my craft/scrap room.
If you are, I would love to hear what you are working on:)
I am going through my craft room once and for all!!!
But this time, I am going to complete it!!
I mentioned in my "Messy Room Tour pt 2" that I am following a couple of challenge prompts.
The first few are to do with papers.
So I went with the easiest of my papers, and that is paper scraps.
We all have them..I know we do, but to store them so we use them is another issue.
Here is how I have been storing my paper scraps for the last 3 years and it is still working for me!
Here is an older post I did on how I store my "Paper Scraps"
But I thought I would tweak it a bit.
Each colour of paper gets its own hanging file folder.
I tried to match the paper scrap colours to the same colour folder.
Blues go in the blue folder, reds go in the red folder and so on.
I put both pattern paper and card stock scraps together in these folders.
If I didn't have a coloured folder for a certain colour of paper (such as my black & white papers or my Christmas themed scraps, I just used a regular brown hanging folder.
I also added a coloured tab I made to the tops of the folders.
Since this was an easy challenge for me, I figured I would redo my tabs as they were looking a little ragged.
I used the Stampin' Up tag punch. I was thrilled to see that the tabs actually fit into the tabbed slots inside the folders.
Now how pretty does this look :)
This time I added the tabs on either side of the file folders.
This way no matter which way they are put back, they can't be put back wrong :)
I store them in this hanging file holder.
They slide easily in here and are so easy to take out and put back.
Lastly I put the whole thing in a tote bag.
There are a couple of reasons why I do this.
1. The metal hooks on the folders would snag my sweaters.
2. Keeping them in the bag makes them easier to move or tote around.
In order to keep my paper scraps from getting out of hand there are a few things that I do.
I share them with all of my friends
If anyone needs a small piece of paper or card stock, I ask them to go in my scrap bin and take what they need.
I go through my scraps once a year.
At the beginning of the year, I try to go through my scraps. I will make card sets to give away as gifts or to hospitals. I punch out shapes out of the smaller pieces and give them away to those that scrap for causes.
Not only is it important to organize your scraps, but it is also important to keep on top of them and use them up.
I also did a video on Defunkifying my Paper Scraps.
If you would rather watch it on my YouTube, just click on the link "Tracy's Treasures24"
Here are my tips to defunkifying/organizing an area:
1. Remove - Take all of your scraps and put them in one area.
2. Sort- Sort all like items together…in this case, all the same colours of papers.
3. Purge- This is my hardest part. Get rid of the papers you will no longer use and donate or recycle them.
4. Organize- Figure out a way that works for you.
File folders work for me, but I have put them in pull out drawers by colours before.
I also keep an envelope in the backs of my paper pads for the scraps for that set of papers.
Everyone is different find out your way…and this may change as you work.
If you are following me along on my mission to get my room in order, I would love to hear what you are working on :)
Yup, another messy room tour.
The difference with this one, is there is no after photos.
The reason….I am going in deep and dirty.
I did a video about a year and a half ago with my messy room and then a few areas that I organized.
And honestly those couple areas are still working for me :)
But as you can see, my room has gone to cr@p again.
I think I need to do a few things differently this time and that is to totally go through EVERYTHING.
So that my friends is why there are no after pictures at the moment…no quick fixes in order for me to get it defunkified once and for all.
This is under my work table/desk.
Yup, I just hide things under there, lol.
In order for my room to work for me, I have to figure out how I operate.
For example:
I am a flipper. I like to flip through my supplies not dig through them.
I am also a piler. If there is a flat surface (even if there are things already there) I will keep piling on stuff until they topple over.
So those are 2 things I have to keep in mind when going through my room.
I am making it a bit easier on myself and following a couple of challenges.
The Wookiemouse challenge…I had done her challenge many years ago, when 2Peas was still active. This really got my room together…before I accumulated so many more supplies.
The second challenge is 52 Week Workspace Challenge. I think this challenge is based on the Wookiemouse challenge, but with worksheets and printouts :)
I am both excited and sad that the day is here.
Tonight is a 90 minute episode of the Walking Dead!!!!
How awesome is that!!!!
But I am also sad, as it is the last episode of the season :(
So today Wayne and I are eating plenty of junk food (Monday is the start of a new healthy eating day, lol) and watching the past episodes of the Walking Dead until the new episode starts.
We aren't obsessed….obsessed would be if we started all of the seasons from season 1.
We don't do that until the new season, teehee.
I hope you all had a very creative day :)
I am editing a few videos during the commercials and walking around the house to get some steps in…got to walk off some of those junk food calories ;)
I really need to stay on top of things…..last day of the month again, and just getting Tim's Tag done.
What I really liked about this tag, was the use of the corrugated cardboard..cool right!!
I ordered a couple more of those FB books from My Social Book, and the cardboard they packaged them in was perfect!!
Not to thick and easy to peel off parts of the top layer.
After distressing it a bit, I had to cut it into a tag shape.
Tim used his foil/glue.
I could not find my foil…it isn't Tim's but I remember doing this many moons ago where I would use Aleene's Tack it Over and Over and then apply the foil to the tacky surface.
I knew I had to get on this tag…so I came up with a different option.
I decided to use gold embossing powder.
I used a make up sponge to pick up some Versa Mark, pounced it through the stencil, then added the embossing powder and heat set it.
See how it shines..not the same as the foil..but use what we have right ;)
I then flicked some black paint on as well.
I like the distressed look.
Now for the tag that goes under this.
The butterfly die cut also comes with a matching embossing folder….love that…Thanks Tim :)
I embossed the butterflies and then added some colour.
I liked the colour, but then kind of mucked it up by adding more colour :(
So to rectify this, with a light hand I picked up some black paint on my make up sponge and grazed over the embossed part of the butterflies.
Lined up the two tags and adhered them together.
I added a word plaque after adding some paint to it.
I wanted to add a bit more spring colour to this tag.
Bonus, I got 2 corrugated butterflies out of this project when I cut the shapes out :)
Here is my tag again :)
I added the same eyelash wool to the top of the tag as I used to attach the word plaque with.
I am not sure why….but not loving my tags I have done so far this year.
Oh well…they were still fun to make and that is what is important right :)
Today I am going to share this card that I made using one of Val's Digital Design new images.
She calls these newest images her Kididles.
They are being released on April 2nd….but I was lucky enough and Val sent me them to play with early :)
Now isn't this little fairy so cute?!!
I think she is just so adorable and I love fairies and all that is whimsical, so that is why I chose this one to colour up first :)
Her name is Fairy Fiona.
They aren't up on Val's site until Saturday, but you can take a peek at her other digital images but clicking on this link "Val's Digital Designs"
If you want to check out what Val did with Fiona, you can check out her blog "Val's Creative Studio"
I coloured Fiona up with my Copic markers….I seem to be a bit out of practice, I really need to get back into my colouring :)
I have been totally re-organizing my craft room and came across these cute tiny kites…I thought it was perfect for this spring-like image :)
The inside of this card :)
One last look at my card :)
And look, another challenge for me :)
I followed the "Mojo Monday sketch challenge" for this card….now lets see if I can remember after I post, to link it….I usually forget to link it until the next day or so, lol.
Like I had mentioned above, I have been in the craft room, re-orgazning and oh my, I have a lot of work ahead of me.
So far I have done my paper scraps, 6x6 papers, 12x12 papers, card stock and stickers.
I told Kristy I was hoping to get my room completed by Friday.
She thought that was quite funny.
Saturday was spent celebrating my friend Lynne's 50th birthday.
Her mom asked me if I could put together some inexpensive centrepieces for the event.
Knowing I never refuse a challenge….I accepted :)
I wanted to use teapots as my friend is an avid tea drinker.
But we couldn't find any really cute teapots.
So my second choice was watering cans in spring-like colours.
Look what was found!!!!
Are these cute or what?!?!
Keeping the cost down is another of my specialties…you know, since I am cheap and all, lol.
The ceramic watering cans were found at the second hand store and were under 2.00 each.
I then made some small tissue paper flowers and adhered them to some coffee stirring sticks and placed them in the containers after putting some easter grass in them.
Lynne's mom's plan was to give them away to the guests by picking numbers.
Turned out everyone wanted them, so her cousins just took them off the tables when they went, lol.
I am still getting used to having my new haircut.
I got 4+ inches cut and am still trying to move it out of the way.
Problem is, there is nothing to move, it is gone, lol.
Spending the day chillaxin' with my Honey as he took today off of work and we decided to just stay at home and watch some movies :)
I am a SAHM (who never gets to stay at home) to 3 beautiful teenage daughters Ashley(born 1989) Heather(born 1991 and Kristy(born 1995).
Wife to my wonderful hubby Wayne. We have been married since 1988.
I am a bookkeeper for my husbands business.
I love to create. I dabble in all types of crafts. Jill of all trades expert in none. Right now I enjoy scrapbooking and paper crafts.
I decided to make this blog to share my creations and a bit of my crazy life.
Thanks for visiting.


